Showing posts with label Stir-fry|Palya. Show all posts

Wednesday, January 25, 2017

Arbi Ki Bhujia | Arbi Dry Sabzi | Sukhi Arbi ki Sabzi

arbi ki bhujia
Colocasia(Arbi) is one of my favorite vegetable and I always end up preparing simple Chamadumpa Vepudu(Arbi fry) with it which is a typical Andhra preparation that goes well with the rice.I love to eat arbi mostly in the dry form like Chamadumpa Vepudu, Arbi ki bhujia or sukhi Arbi or Arbi Tikka but if you are looking for gravies you can check out this Arbi ka Salan recipe too.
arbi stir fry
We usually prepare arbi fry in a simple way - we boil the arbi and then it is peeled,cut and fried(deep fried or shallow fried) and sprinkle with simple spices.But today I am posting a preparation where we use raw arbi to make this stir fry.I got to know about this preparation of North Indian style arbi ki bhujia only through my cook when we were in Mumbai and we absolutely loved it.I usually prepare it as a side dish when we prepare heavy gravies like chole or rajma and that combination works great with rotis.It tastes even nice with rice and dal too.Now off to the recipe.
suki arbi ki sabzi
dry arbi sabzi
Arbi Ki Bhujia | Dry Arbi Sabzi Recipe:
Serves 2-3 | Author: Prathibha
Prep time: 15 mins | Cooking time; 20 mins | Total time: 35 mins
Cuisine: North Indian | Category: Main Course-Side dish
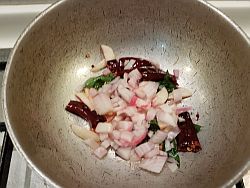
Ingredients:
250 gms Arbi/Colocasia
1.5 tsp Carom seeds(Ajwain)
1 tsp Red Chili powder
1/2 tsp Turmeric powder
1.5 -2 tsp Amchur powder(Dry Mango powder)
Salt to taste
2 tbsp Mustard Oil(or any regular oil)
Lemon wedges, to serve

Method:
  • Wash the colacassia nicely and scrape the skin off using a knife and wash them thoroughly again. I would suggest you to wear gloves for this step as arbi gives itchiness to the skin.
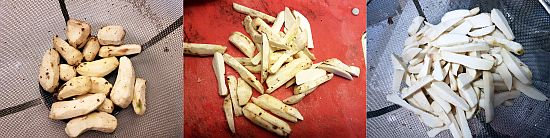
  • Cut arbi into thin slices length wise and cut them into strips looking like thin french fries.
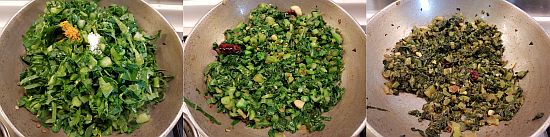
  • Heat oil in a flat pan and add carom seeds and let them sizzle and then add cut arbi strips and fry them well for 12-15 mins until you see them turning brown in color and got cooked thoroughly inside.
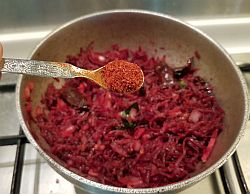
  • Add salt, red chili powder, turmeric powder and amchur powder and mix well and let it cook for a couple of minutes more.
  • Switch off the flame and let them rest for an hour two.
  • Heat them over medium flame until they turn crispy again and serve.
Serve it with phulkas/rotis/parathas or rice along with lemon wedges. The addition of lemon reduces the itchiness caused by the arbi sometimes.

Notes:
  1. It is a simple stir fry recipe where the flavors play a major role.The addition of mustard oil, carom seeds and amchur powder gives its own taste to this stir fry.
  2. I suggest you to add more amchur powder than regular as it helps in reducing the itchiness created by arbi.Also, it is suggested to let the curry sit for an hour or two else it might cause itchiness to yur throat when eaten fresh.
sukhi arbi sabzi

Monday, January 9, 2017

Grated Beetroot Stir fry with Garlic | Easy Beetroot Stir fry Recipe

grated beetroot stir fry
I have already posted two versions of the beetroot stir fry - Beetroot Stir fry using Coconut and the other version - Spicy Beetroot Curry using Vangibath masala powder. You must be wondering why again this new version and what is it about. I had tasted this simple version of garlic flavored Grated Beetroot stir fry in a meal cooked by a cook during my pregnancy and instantly liked it and from then it has been added to our regular menu. I make it quite often that I prepare this version more than the regular coconut version. I love garlic and the roasted crushed garlic imparts a nice taste to the curry. Also as the beetroot has been grated this cooks very fast compared to the chopped beetroot curry.I also prepare the same version with carrot and even that tastes very nice.
grated beetroot stir fry with garlic
In Kerala, they make Beetroot thoran with grated beetroot and coconut, I would post that version some time later.This is a very basic recipe that even a beginner can prepare it in the kitchen. You can pair it with hot steaming rice or roti, it tastes nice and makes a simple meal.If you like Beetroot then you must check out Bengali Vegetable Chops with beetroot stuffing and also Carrot-Beet Halwa. recipes.
You can check out various vegetables and greens stir fry recipes here to pair with everyday dal/sambar and rice.

grated beetroot stir fry

Grated Beetroot Stir fry Recipe:
Serves 2 | Author: Prathibha
Prep time: 5 mins | Cooking time: 15 mins |  Total time: 20 mins
Cuisine: South Indian | Category: Stir-fry/Palya

Ingredients:
1 large Beetroot, peeled and grated
1 medium Onion, finely chopped
3-4 pods of Garlic, peeled and crushed
1/2 tsp Red chili powder or Garlic Chili powder
1 Red chili, broken
1 tsp Urad dal
1/2 tsp Mustard seeds
7-8 Curry leaves
1.5-2 tbsp Oil
Salt, to taste

Method:
  • Wash,Peel and grate Beetroot and keep it ready.
  • In a kadai heat oil and crackle mustard seeds and then add urad dal, broken red chili,garlic pods and curry leaves and fry until the dal turns a bit red in color.
  • Add finely chopped onion and fry until the onions turn slight brown in color.

  • Now add grated beetroot and salt and mix nicely and cover it and cook for 5-6 mins.Add a tbsp of water if needed.
  • Open the lid and add the chili powder (Garlic chili powder) and mix nicely and cook for another 2-3 mins.
  • Switch off the flame.
Serve it hot with rice/roti/chapati.

Notes:
  1. You can replace beetroot with carrot in the recipe and follow the same method by grating the carrot or you can even mix both grated carrot and beetroot and follow the same recipe.
  2. Crushed garlic pod is the star ingredient in this simple recipe, do not skip it.
  3. Also I have mentioned more oil quantity as it depends on the size of the beetroot and also somehow this simple stir fry tastes best when made with more oil.You can reduce it if you want.
  4. Do not cook the curry for very long period.It cooks very fast and tastes best when a slight crunch is maintained in the beetroot.
grated beetroot stir fry with garlic

Friday, November 11, 2016

Indian style Choy Sum(Chye Sum) Stir Fry | Chinese Greens in Indian Cooking

indian style choy sum stir fry
I love to include lot of greens in my daily cooking and it is a real challenge to find Indian greens here in Singapore in the local markets unless one makes a trip to Little India or any Indian store. I have started using lot of Chinese greens like Chinese Spinach, round Spinach, Bok Choy, Red Spinach and Choy Sum on regular basis and get the usual Indian greens when we go to Little India.
chinese choy sum greens
Choy Sum is a Chinese green with tiny yellow flowers and also has thick stalks like the size of the Asaparagus, you will get a better idea when you the pictures of these greens in the recipe. Choy sum is usually cooked with soya sauce and garlic and is served as a side dish. Choy Sum was a very interesting find for me as it was suggested by my helper to try. I am really glad that I tried it and liked it too and it adapted the Indian flavors very nicely.It has a very mild pungency like mustard greens but even my 2 year old kiddo also had it with out any complaints, so it has become quite regular in my cooking now.
choy sum stir fry
Check out other greens stir fry recipes in my blog:
chinese choy sum

choy sum stir fry
Indian style Choy Sum Stir fry Recipe:
Serves 2-3 | Author: Prathibha
Prep time: 10 mins | Cooking time: 20 mins | Total time: 30 mins
Cuisine: South Indian | Category: Main Course(Side dish for Rice)

Ingredients:
1 big bunch of Choy Sum
1 Onion, finely chopped
3-4 Garlic pods, roughly chopped
2-3 Red chilies
1/2 tsp Fenugreek seeds
1 tbsp Oil
Salt to taste

Method:
  • Wash and clean the choy sum and separate the greens from the stems and reserve the thick stems aside. Finely chop the greens along with flowers and tender stalks and keep it aside. Trim the thick stalks and peel the skin like how we do for carrots and finely chop the inner stalks and keep them aside.
  • In a kadai heat oil and add fenugreek seeds and fry for half a minute.
  • Add chopped garlic and red chilies and fry for another half minute.Now add chopped onions and fry until they become translucent.
  • Now add chopped choy sum stalks and cook until they are half done, then add the chopped greens to it and add enough salt(add less salt as the greens take less salt) and cook for 8-10 mins until they are cooked by stirring it in between.
Serve it hot with Rice, Sambar/Dal and papad/fryums.

Notes:
  1. You can skip garlic and onions in the recipe and add 2 tbsp grated fresh coconut at the end to the cooked greens. It tastes nice either ways.
  2. You can make greens like amaranth leaves, red amaranth, tender radish greens following the same way, it tastes nice.
choy sum stir fry

Thursday, June 4, 2015

Akakarakaya Kura | Kantola Curry

akakarakaya kura
My blog has been silent from past some time, the reason simply because was that the past few months I have become extremely busy with my toddler and also was busy with my family.Though I did not want to take a break from blogging, with the growing demands of my toddler I am finding it difficult to blog on regular basis.It takes a while for me to blog regularly with enthusiasm like before, till then I would try to update my blog when I find time, please bear with me!
akakarakaya kura
Akakarakaya,known as 'Kantola' in English is a kind of gourd which is slightly bitter in taste but not as bitter as bitter gourd.This vegetable is seasonal and hence when ever I find this vegetable in market I usually buy it as it is not easily available near my place.If you are not someone who likes bitter gourd this mildly bitter kantola would definitely impress you in the first taste.I usually prepare a simple stir fry or curry with this vegetable and not experimented other variations with this vegetable. I like this vegetable very much as it has slight crunch even after it has been cooked.If you want to check out Kantola Stir fry(Akakarakaya Vepudu) recipe check out here.
akakarakaya kura
Akakarakaya Kura | Kantola Curry Recipe:

Serves 2 | Author: Prathibha
Prep time:10 mins | Cooking time: 30 mins | Total time: 40 mins
Cuisine: Andhra | Category: Side dish-Lunch

Ingredients:
250 gms Akakarakaya/Kantola
2 Onions,chopped
2 tbsp Sesame seeds powder
1 tsp Red chili powder
1/2 tsp Turmeric powder
1 tbsp Chana dal
1 tsp Urad dal
1/2 tsp Mustard seeds
a sprig of Curry leaves
Salt to taste
1 tbsp Oil

Method:
  • Wash and cut the kantola into four quarters and cut into thin slices.
  • Heat oil in a kadai and crackle mustard seeds.Add chana dal and urad dal and fry until it turns red in color.
  • Add curry leaves and chopped onions and fry until it turns translucent.Now add the chopped kantola pieces and fry for 5-6 mins.Add turmeric powder to it and cover it and cook for 12-15 mins until it is done.
  • Add red chili powder, sesame seed powder and salt and mix well and cover it and cook for 3-4 mins and switch off the flame.
Serve it with Rice/Roti.
kantola curry

Notes:
  1. You can replace kantola with bitter gourd,bottle gourd or ridge gourd and follow the same process.In case if you are using bitter gourd,add salt and turmeric powder to the bitter gourd pieces and leave them aside for 15-20 mins and squeeze to remove extra water and follow the same process,this way it removes the bitterness of bitter gourd.
  2. Instead of sesame seed powder you can even use telagapindi in the recipe.
akakarakaya kura

Monday, June 16, 2014

Gawar aur Aloo ki Sabzi | Cluster Beans-Potato Curry

 Gawar ki Sabzi
We get very good and tender Cluster beans in Mumbai and hence it is again one routine vegetable which appears frequently at my place.Cluster beans take a bit of time to clean, chop and cook but it has good fiber content and hence I include it often.'Cluster beans' are called 'Gawar ki Phalli' in Hindi and 'Goruchikkudu' in Telugu.
I have posted a south Indian style Cluster beans curry(Goruchikkudu kura) earlier and today I am sharing a Maharasthrian version called - Gawarchi Bhaji which can be paired with rice or rotis.I usually pair cluster beans with potatoes as they make a nice combination with rotis. The addition of groundnut powder enhances the taste of the curry, do give this version a try next time.
cluster beans potato curry

Gawar ki Sabzi with Aloo | Cluster beans - Potato Curry Maharasthrian style:
Serves 2-3
Prep time:20 mins | Cooking time:30 mins | Total time:50 mins
Cuisine:Maharashtrian-India | Category:Curry-Side dish

Ingredients:
250 gms tender Cluster beans
1 large Potato
1 Onion,chopped
2-3 tbsp roasted Groundnut powder
3/4 tsp Red chili powder
1/4 tsp Garam masala or 1 tsp Goda masala
1 tsp Coriander powder
1/4 tsp Turmeric powder
3/4 tsp roasted Cumin powder
6-8 Curry leaves,chopped
1 tsp Cumin seeds
1/2 tsp mustard seeds
2 tbsp Oil
Salt to taste

Method:
  • Wash and wipe cluster beans and remove the ends and stings and pluck them into 1" pieces using hands.Steam it for 10 mins or 2 whistles in pressure cooker.You can skip steaming if you want to cook it directly.
  • Peel the potatoes and cut into thin fingers of  1" length.
  • Heat oil in a big thick kadai /pan and crackle mustard seeds and cumin seeds.
  • Add chopped onions and curry leaves and fry until they turn translucent.
  • Add potato fingers to it and fry for 2-3 mins.Sprinkle some water and cover it and cook for 5-7 mins until it is 3/4th cooked.(If you are cooking cluster beans directly add them along with potatoes and cook them together.You need to add required water to let it cook,so keep checking in between if it needs more water,sprinkle water in regular intervals so that the vegetables would not get burnt).Add steamed cluster beans and cook for another 3-4 mins until the potatoes are done.
  • Add all the spices and salt and mix nicely.Cover it and cook for 2-3 mins.
  • Switch off the flame and add roasted ground nuts powder and mix it.
Serve it hot with Roti/Phulka/Rice.

Notes:
  1. You can avoid potatoes and prepare this only with cluster beans.
  2. I like it to be a slightly dry version.If you want you can make it to a slight gravy by adding water and more ground nut powder and boil at the end.
  3. You can prepare this curry in a pressure cooker by following the same process and pressure cook with little water for 1-2 whistles.Once the steam subsides,increase the flame and let the water evaporate if you prefer a dry version or serve as it is if you like gravy version
  4. You can add grated coconut or dry coconut powder along with ground nut powder at the end.

Wednesday, May 21, 2014

Arbi Roast | Chamadumpa Vepudu

arbi roast
According to me, Arbi(Taro root) is one of the most tastiest vegetables and I prepare it almost every weekend as TH is also very fond of it. I make mostly dry preparations like arbi fry,arbi roast to pair with rice or as marinated dahi arbi roast or arbi ajwaini which pairs nicely with rotis.Arbi fry tastes best when it is deep fried and as I do not use much oil in my cooking I prefer to do it in my oven which not only saves my time but also consumes very less oil. I use my oven often in my cooking and it helps in preparing most of the vegetable fries - potatoes, ladies finger, raw banana, yam with very less oil.
chamadumpa fry
Check out other fry recipes in my blog.
chamadumpa vepudu

Arbi(Taro root) Roast | Chamadumpa Vepudu:
Serves 2
Prep time: 10 mins | Cooking time: 30 mins | Total time: 1hr(with cooling time)
Cuisine: South Indian | Category: Stir fry|Curry

Ingredients:
250 gms Arbi(Taro root)
1 tbsp Rice flour
1 tsp Red chili powder
1/4 tsp Turmeric powder
1/2 tsp Amchur powder(optional)
Salt to taste
1 tbsp Oil

to temper:
1 tsp Urad dal
1/2 tsp Mustard seeds
2 Red chillies,broken 
a sprig of Curry leaves
1 tbsp Oil

Method:
  • Soak arbi in water for some time and rub it nicely to remove extra dirt and wash it  properly in few changes of water.Pressure cook arbi with enough water for 1 whistle.Let them cool completely.Peel the skin and chop them into big chunks.
  • In a bowl add chopped taro root(arbi) and sprinkle rice flour, red chili powder, turmeric powder, amchur powder, salt and oil to it and gently mix so that the spice mix coats all the pieces nicely.You can add more rice flour if you need and also adjust the seasonings according to your wish.
  • Now follow any of these 3 methods which I mentioned below.I followed the oven method which is healthy and less calorie version and also yields very crispy fry.
method1:
  • Line the baking tray with silver foil and arrange these slices in a single layer and sprinkle some oil over it and bake in oven at 160 deg for 20-25 mins.Keep an eye after 20 mins so that they will not get burnt.If the edges are crispy and changes its color means its done.Do not over bake them,they will become tough.
method2:
  • Deep fry them in oil until golden brown and crisp.
method3:
  • In a wide non-stick kadai heat 2 tbsp oil and arrange the taro root pieces in a single layer and let them fry for 12-15 mins until crisp.Give a stir in between so that they don't get burnt.
  • Heat the kadai and add 1 tbsp oil and heat it.
  • Add mustard seeds and let them crackle and then add urad dal,red chillies and curry leaves to it.
  • Add fried taro root chunks (prepared by following any of the three methods mentioned above) and fry them on medium-high flame for 2-3 mins.
Serve them hot with rice or as a side dish for sambar/rasam with rice.
chamadumpa vepudu

Notes:
  1. These kind of roasts/fry will loose their crispiness after a while,so its better to serve immediately.
  2. In case you want to serve later you can roast them again in the same pan for 4-5 mins on medium flame to get the crispiness back at the time of serving.
  3. You can follow the same process for potatoes,baby potatoes and Raw Bananas.
  4. You can replace rice flour with besan(chickpea flour).
  5. You can add sambar powder along with red chili powder in the recipe.
  6. Do not cook for long as the taro root will get mushy.

Friday, December 6, 2013

Fenugreek leaves Stir fry | Methi Bhaji

fenugreek leaves stir fry
I use various varieties of greens- green/red amaranth, methi, palak and dill leaves regularly in my cooking and I make it a point to use them at least 3-4 times a week to pair with my Jowar bhakris.I prepare either stir fry or dal with red and green amaranth but methi and palak are very versatile greens and can be used for various preparations-snacks,dal,stir fry,curries,gravies,rotis,parathas etc. However, if I want to serve the greens with bhakris,I prefer it in the form of either a simple stir fry or Saag.
This is a typical Maharasthrian style preparation of greens,you can adapt this recipe to prepare any greens stir fry.It is called as 'Methichi Bhaji' in Marathi.Usually Maharashtrians do not add any tempering in the greens and keep the garlic to dominate the flavor in the stir fry.I just love this simple stir fry and I sometimes add soya chunks or fried mini urad vadis to it, to add a nice bite to them.
methi stir fry


Fenugreek leaves Stir fry | Methichi Bhaji Recipe:
Serves 2-3
Preparation time: 15 mins | Cooking time: 20 mins | Total time: 35 mins
Recipe Cuisine:Maharasthra - Indian | Recipe Category: Side dish for Rice/Roti

Ingredients:
1 big bunch Fenugreek leaves/Methi
15-20 Soya Chunks(optional)
1 big Onion,roughly chopped
4-5 Green chillies,finely chopped
5-6 Garlic pods
2 tbsp Oil
Salt to taste

Method:
  • Clean the fenugreek leaves and wash them properly and soak it in salted water for 8-10 mins.Chop the leaves finely along with tender stalks.
  • Boil water in a small pot and add soya chunks and boil them for 4-5 mins until they are done.Drain them and cool them slightly,squeeze the extra water from it and drop them in normal water and squeeze them again and repeat it one more time.If you are using big soya chunks,chop them into small pieces roughly and ignore it if you are using mini soya chunks.
  • Heat oil in a kadai and add chopped garlic and fry until they turn slight brown in color.
  • Add chopped onions and green chillies and fry for few mins until onions turn pink.
  • Add squeezed soya chunk pieces and stir fry for 2 mins.
  • Now add the chopped methi leaves and fry for 10-12 mins until the fenugreek leaves are cooked.Take care that you would not over cook the greens,they taste best when they are cooked right.You can initially cover it slightly for 2-3 mins and then remove it later and fry it with out lid.
Serve it hot with Roti/Rice/Jowar Bhakri/Bajra Bhakri.

Notes:
  1. You can use green amaranth leaves or red amaranth leaves or spinach and follow the same process.
  2. I usually do not add any seasonings in the oil as I like the garlic flavor to dominate in the recipe.You can reduce the garlic if you are not a big fan of it.
  3. I like to keep this recipe simple as it tastes best as it is and I love to eat this with Jowar or Bajra Bhakris.
  4. Use only tender stems of the greens for this recipe.Chop them roughly.
  5. The addition of soya chunks is entirely optional,I like to add them as they give a nice bite in the curry.They absorb the flavors beautifully too.


methichi bhaji

Monday, October 14, 2013

Aratikaya Vepudu | Raw Banana Stir fry

aratikaya vepudu
'Stir Fry' or 'Vepudu' is a part of typical Andhra meal and we prepare various stir fries on a daily basis to pair with steamed rice. One can prepare either the deep fried stir fries, which are definitely tastier and also the shallow fried simple stir fries. Vegetables like Potatoes, Ladies finger(Okra), Arbi(Taro root), Brinjal, Raw Banana and Yam taste really delicious in the form of stir fries, you can either deep fry them or shallow fry them based on your requirements and season it with Garlic chili powder, it tastes yumm!! I would say a simple Stir fry and Rasam with hot rice and few fryums is a comforting meal for me .
raw banana stir fry
'Raw Banana' also known as 'Raw Plantain' or 'Aratikaya' in Telugu and 'Balekai' in Kannada. Let us check out the simple yet delicious stir fry using raw bananas.
Check out few more interesting preparations with Raw Banana here.
raw plantain stir fry

Aratikaya Vepudu | Balekai Palya | Raw Banana(Plantain) Fry:
Serves:3-4 persons
Prep time:15 mins | Cooking time:15 mins | Total time:30 mins
Cuisine: South Indian | Category: Stir fry - Side dish

Ingredients:
2 Raw Plantains(Raw Bananas)
1 Onion,finely chopped
2-3 Garlic pods,crushed
8-10 Curry leaves
1 tsp Urad dal
1 tsp Chana dal
1 tbsp Oil

Method:
  • Steam the raw plantains for 10 mins or pressure cook for 2 whistles.Cool it and peel the skin and cut it into small pieces.
  • Heat oil and crackle mustard seeds and add chana dal and urad dal and fry for few mins.
  • Add curry leaves, chopped onions and crushed garlic and fry until the onions turn pink.
  • Add chopped raw banana pieces and fry for 8-10 mins until they become slightly crisp.
  • Now add Garlic chili powder and mix nicely and fry for 2 mins.As the garlic chili powder already has salt we don't need to add extra salt,check the taste and add salt if required.Add more garlic chili powder if you want it more spicy.
Serve it hot with hot steamed rice,ghee and fryums or as a side dish with sambar rice or rasam rice.

Notes:
  • You can also pound 3-4 green chillies with 5-6 garlic pods and 1/4 cup grated fresh coconut and add it at the end for a variation.
  • If you do not have Garlic chili powder,increase the amount of garlic pods to 4-5 and also add 3/4 tsp red chili powder and salt at the end.
  • You can follow the same process for vegetables like potatoes,Taro root(Arbi) and Yam(kandagadda). It tastes delicious.
raw banana stir fry

Wednesday, September 4, 2013

Ammini Kozhukattai | Undrallu Sundal | Ganesh Chaturthi Recipes

ammini kozhukattai
We usually prepare Undrallu Sundal with the left over dough of the modak(kudumulu) and also we make very less quantity to offer for Neivedyam on Vinayaka Chavithi as we prepare lot of other varieties too. Otherwise we usually make this as a snack for evening to enjoy it.During the season of Avarekalu(hyacinth beans) we prepare this with the tender hyacinth beans known as Avarekalu Kadubu which is really tasty. I had prepared this Undrallu Guggillu along with Pappulo Undrallu as the base for both the recipes are same.It is a very simple and delicious snack.
undrallu sundal
We call 'Undrallu Sundal' as 'Regi Undralla Guggillu' but as it is bit unusual name for many I named it with the most commonly known name - 'Ammini Kozhukattai' as it is called in Tamilnadu. The preparation process for this snack is really time consuming as the rolling of tiny balls takes lot of time and it would be easy to make in large quantity if you have some one to help.
ammini kozhukattai

Check out other important recipes for Vinayaka Chavithi:
For a complete list of various options for Ganesh Chaturthi menu, check out here.
    ammini kozhukattai

Undrallu Sundal | Undralla Guggillu | Regi Undrallu Kadubu Recipe:
Serves 3-4
Prep time: 30 mins | Cooking time: 30 mins | Total time: 1 hr
Cuisine: South Indian | Category: Snacks/Accompaniments

Ingredients:
for Rice Flour Marbles:
1 cup  Homemade Rice flour
2 cups water
2 tsp oil
1/2 tsp salt

for Seasoning:
1/2 cup grated fresh Coconut
1/4 cup chopped Coriander
 3-4 Green chillies, slit or 1 tsp Green Chilli Paste
2 Red chilies, broken
1-2 tsp Lemon Juice(or to taste)
1 tsp Mustard Seeds
1/2 tsp Cumin seeds
1 tbsp Chana dal
1 tsp Urad dal
2-3 tsp Oil
a pinch of Asafoetida
Salt to taste

Method:
to prepare Undrallu/Rice flour Balls:
  • In a vessel, add water, salt and oil and let it come to a boil.
  • After it boils, reduce the heat and add rice flour. At this point don't touch the rice flour, leave it as it is for exactly 15 mins over medium heat.
  • Switch off the flame and using a ladle mix it well until you get it into a smooth consistent dough (as shown in the picture). Once it cools a bit, you can use your hand at the end to knead into a smooth dough as shown in picture.
  • Take an empty vessel and apply oil on its base and edges.Take some dough in your hand, and using your fingers make small balls as shown in picture (the smaller the balls, the better the taste.it all depends on your patience).If the dough keeps sticking to you hand, smear little oil to your fingers to continue making the balls. This is the most time consuming process but the end product makes you forget all the pain you have taken while making it.
  • After you finish making all the balls, place the vessel in a pressure cooker without any lid on the vessel. Do sprinkle one or two tea spoons of oil on the top of the balls and steam it for 10-15 min without using a weight (like you would make idly).
  • Once the pressure drops open the cooker and place the vessel aside. You should be seeing shiny balls as shown in the picture.
to do Seasoning Part:
  • Heat oil in a pan and add mustard seeds and let them splutter and then add urad and chana dal until golden brown.
  • Now add cumin seeds, asafoetida, red chillies and green chillies (or green chili  paste).
  • Add rice balls from the vessel and mix it well in medium heat for about 5min.
  • Finally switch off the stove and add salt, lemon juice, grated coconut and cilantro and mix it well.
Serve it hot and enjoy the snack!

regi undrallu guggillu

Notes:
  • During the season of Avarekaalu(hyacinth beans), you can boiled Avarekalu to the tempering and fry nicely and follow the same process. It tastes nice.
  • You can even add 1-2 tbsp. Idli Milagai podi at the end and mix nicely for a more spicy version.
 
back to top